Yearly Archives: 2008

Easy Poll

Easy Poll 

Easy Poll

Easy Poll is a PHP script to create your own poll. It’s very easy to install and run. Design of the poll is fully editable, you may insert the poll into any page you want. You can use it on an unlimited number of webpages for free.

This tutorial explains to you how to configure your Easy Poll to publish to your Doteasy server. To follow this tutorial you will need to have your Doteasy Member ID and password, an Easy Poll scripts and an internet connection.

*This script is supported by Doteasy.com Ultra and Unlimited hosting packages.

Easy Poll : Installation Guide :


    1. Download the current zip file from the Easy Poll’s Official Website here.
    1. Uncompress the zip file using WinZip or WinRAR to a temporary directory in your local computer.
    1. You can create a folder called “Poll” in the “/var/www/html” directory. Then you can upload all the Easy Poll files to the web server using a FTP client. For FTP upload instructions, please click here.
    2. Open www.yourdomain.com/Poll/setup.php file via your Web Browser to begin the installation. Please replace yourdomain with your domain name.
  1. Following are the settings for the installations:

    Mysql database host: 127.0.0.1

    Mysql database username: Your database user name

    Mysql database password: Your database password

    Name of mysql database : Your database name

    Table name: Do not need to change.

    Full path to the folder where this scripts is installed. No trailing slash: Do not need to change.

    URL of the directory where your php scripts are installed. No trailing slash: Do not need to change.

    URL of a page to display after a vote has been sent: Do not need to change.

    Step 1

  2. Go to the admin area (both username and password are “admin1”), to “configuration” and enter a value to each field.

    Step 2

    Step 3

    Now you can create a poll and check if all works fine. The poll may be added to any page by inserting

    to the place where the poll should be viewable.

    Each visitor voting in the poll gets a cookie so nobody will be able to vote again in the same poll.

    Copy and paste the scripts code to the html souce file to test the poll scripts.

    Step 4


    Doteasy client? Need a free installation service for this script? Please contact us
    here
    .

Easy Poll References:

Official Website: http://www.izeit.nu/

Download: Easy Poll

Official Support Forum: http://www.phpwebscripts.com/forum/index.php


Pixelpost

Pixelpost v1.7.1

Pixelpost

Meet Pixelpost, a small photoblog application that is easy to setup and use. It’s perfect for anyone wishing to regularly post their photos on the web like a blog.

Unlike other blog engines out there, Pixelpost doesn’t try to solve all of the worlds problems. Pixelpost simply does photoblogs, and it does them well. If you are looking for a full blown CMS or text-blog, Pixelpost isn’t for you. But if you want something simple, and designed from the ground up for photobloggers, like yourself, you’ve found the perfect application.

* This script is supported by Doteasy.com Ultra and Unlimited hosting packages.

Pixelpost v1.7.1 Installation Tutorial:


    1. Download the current version from the Pixelpost Official Website here.
    1. Uncompress the zip file using WinZip or WinRAR to a temporary directory in your local computer.
    1. You can create a folder called “gallery” in the “/var/www/html/” directory. Then you can upload the Pixelpost files to the web server using a FTP client. For FTP upload instructions, please click here.

      For this example, Pixelpost will be uploaded to /var/www/html/gallery/ directory and the website address will be http://www.yourdomain.com/gallery/index.php

Upload Pixelpost
Upload Pixelpost

    1. Begin Installing – Run the install script on your server (by going to http://www.yourdomain.com/gallery/admin/install.php with your web browser) and follow the on screen instructions.
      * You can select your favorite language here.

Welcome
Welcome

    1. Startup Information – What does Pixelpost need to know for the next installation step?

Startup Information
Startup Information

    1. Requirements – Here you see the result of some server tests Pixelpost runs before the installation.

Requirements
Requirements

    1. Database Settings – Fill in the necessary information in the following fields (For this step, we are assuming that you have already created and set up your MySQL database. If you have not done this yet, please click here to see the MySQL creation tutorial.)

      Database Host: 127.0.0.1

      Database name : domain_com_-_db

      Database Username : your Doteasy.com member ID

      Database Password : your MySQL database password

      Database prefix: pixelpost_

Database Settings
Database Settings

    1. Administrator Details – Please enter your administrator login and administrator email here. Pixelpost can send you your login data to the email address provided. You can change all of these settings later on in the administrator panel.

Admin setup
Admin setup

    1. Settings – Here you can enter some main settings. You can change all of these settings later on in the admin panel.

Settings
Settings

    1. Configuration – If you see this screen, everything was ok and Pixelpost could create your configuration file automatically. You can proceed by pressing the button “Continue Installation”.

Configuration
Configuration

    1. Finalize – If you see this screen, you are done! All database tables are created and everything is ready to go. Pixelpost provides you once more with your administrator login data, keep it well, you will need it the next time you want to access the admin area.
      For now, Pixelpost has logged you in already and will lead you right into the admin panel where you can upload your first image. And while you are there, you should explore your admin panel. You can find out detailed information on each menu of the Admin Panel in the documentation.

Finalize
Finalize

    1. Now, you finish the Pixelpost installation. Please delete or rename /admin/install folder in your ftp.
    1. Congratulations! The script is now installed.
      Visit http://www.yourdomain.com/gallery/ to view your gallery.
      Attention: All Pixelpost Addons are turned off after installation. The basic Pixelpost functions are provided without any Addon, so please visit the Addons page in your Admin Panel, check out which Extentions you want to use and turn on only those.
    1. Troubleshooting (FAQ)
      Visit http://www.pixelpost.org/docs/FAQ/FAQ


Doteasy client? Need a free installation service for this script? Please contact us
here
.

Pixelpost References:

Nucleus Blog CMS

Nucleus Blog CMS 3.4.1

Nucleus offers you the building blocks you need to create a web presence. Whether you want to create a personal blog, a family page, or an online business site, Nucleus CMS can help you achieve your goals. Nucleus is a Content Management System (CMS): a powerful set of PHP scripts that allow you to maintain one or more weblogs or online journals.

*This script is supported by Doteasy.com Ultra and Unlimited hosting packages.

Nucleus Blog CMS 3.4.1 Tutorial:


    1. Download the current zip file from the Nucleus CMS Official Website.
    1. Uncompress the zip file using WinZip or WinRAR to a temporary directory in your local computer.
    1. You can create a folder called “blog” in the “/var/www/html/” directory. Then you can upload the Nucleus Blog CMS files to the web server using a FTP client. For FTP upload instructions, please click here.

      For this example, Nucleus Blog CMS will be uploaded to /var/www/html/blog/ directory and the website address will be http://www.yourdomain.com/blog/index.php

      * Optional :
      3.1. To make your install process even easier, you can change the file permissions on config.php to 666. This way, the install script will be able to update it automatically instead of you having it to do manually.
      3.2. If you want to use file upload, you’ll need to add write permissions to the /media/ directory. This is needed in order to allow PHP to write uploaded files into that directory. The directory should be chmodded to 755.
      3.3. If you want to use the SkinFiles plugin to edit files, you’ll need to change the permissions on all files and directories under the /skins/ directory. To be able to edit files, they should be chmodded to 666. To be able to create new files or directories, the parent directory should be chmodded to 777.

    2. Run the install script on your server (by going to http://www.yourdomain.com/blog/install.php with your web browser) and follow the instructions.

    1. Fill in the necessary information in the following fields (For this step, we are assuming that you have already created and set up your MySQL database. If you have not done this yet, please click here to see the MySQL creation tutorial.)

      Hostname : 127.0.0.1

      Username : your Doteasy.com member ID

      Password : your MySQL database password

      MySQL database : domain_com_-_db

    1. When finished, click on “Install Nucleus”
    1. Change the permissions on config.php back to 444 for security reasons
    1. Delete install.php and install.sql, if you don’t, you will not be able to access the Admin area
    1. Congratulations! The script is now installed.
      Visit http://www.yourdomain.com/blog/ to view your blog(s)
      Visit http://www.yourdomain.com/blog/nucleus/ to see the administrative area
    1. Troubleshooting (FAQ)
      Visit http://docs.nucleuscms.org/item/149


Doteasy client? Need a free installation service for this script? Please contact us here.


Nucleus Blog CMS 3.4.1 References:

Official Website: nucleuscms.org

Download Page: http://nucleuscms.org/download.php

Doteasy Free Guestbook Web Tool

Doteasy Free Guestbook Web Tool

The Doteasy Web Tools are a suite of handy plug-in tools provided to Doteasy customers that allows the addition of dynamic database-driven website functionality without needing to have account scripting capability. These tools can be used by anyone with a Doteasy account.

The Guestbook is the perfect way to let your visitors leave a public message for all to see. It’s very simple to use!

*This tool is supported by all Doteasy.com hosting packages.

Doteasy Free Guestbook Web Tool Setup Tutorial:


    1. Login to Doteasy Member Zone. Doteasy Member Zone is located athttps://member.doteasy.com/
    1. Click on “Web Plug-ins” under “Web Tools” to proceed.

    1. Click on the Guestbook link to proceed.

      Click Image To Enlarge
      Click Image To Enlarge

    1. Click on the “Create Guestbook” link.

      Click Image to Enlarge
      Click Image to Enlarge

    1. Follow all of the on-screen instructions and enter required information. Once you have configured your Web Tool, you will need to publish it by inserting the Web Tool HTML code into your web page HTML. To do this, first click on the “Publish Guestbook (Get HTML Code)” link. This will link to the Plug-in Code Window.

      Click Image To Enlarge
      Click Image To Enlarge

    1. Then you need to copy the entire lines of HTML code for pasting into you HTML page. Select the entire block of code and press CTRL-C to copy. The Web Tool can only be installed at the URL listed on the page. Click “Finish” to close the dialog box.

      Click Image To Enlarge
      Click Image To Enlarge

      Tip: You can insert your mouse cursor in the text box and press CTRL-A to select all, and CTRL-C to copy.

    1. Open the HTML page to which you would like to add the Web Tool in a text editor such as Notepad or Macpad. Place the cursor in between the and tags of the HTML code.

      Line breaks or word-wrapping cannot be introduced into the Web Tools plug-in code which is why it’s important to use a text editor to paste the plug-in code and not a word processor.

      Tip: The position within the and tags of the HTML code that you paste the Web Tools HTML code to, determines where it will appear on the page. If you want the Web Tool to appear at a lower position on the page, paste it closer to the tag.

  1. After you have successfully pasted the HTML code into your web page, save the changes and close your text editor software.

    Start your FTP software to upload your updated page to your server. If your FTP software asks you if you would like to overwrite the existing version of the page, you may reply us. Remember to refresh your web browser to properly display the changes.

    Please be advised that Web Tools will not display until they are PUBLISHED to your server. Therefore it is impossible to preview how the Web Tool will look on your.

Doteasy Free Hit Counter

Doteasy Free Hit Counter Web Tool

The Doteasy Web Tools are a suite of handy plug-in tools provided to Doteasy customers that allows the addition of dynamic database-driven website functionality without needing to have account scripting capability. These tools can be used by anyone with a Doteasy account.

This simple hit counter will provide page hit information to you at-a-glance for simple hit statistics information.

*This tool is supported by all Doteasy.com hosting packages.

Doteasy Free Hit Counter Web Tool Setup Tutorial:


    1. Login to Doteasy Member Zone. Doteasy Member Zone is located athttps://member.doteasy.com/
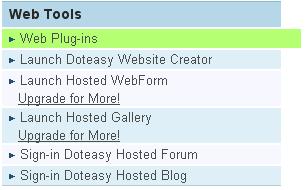
    1. Click on “Web Plug-ins” under “Web Tools” to proceed.

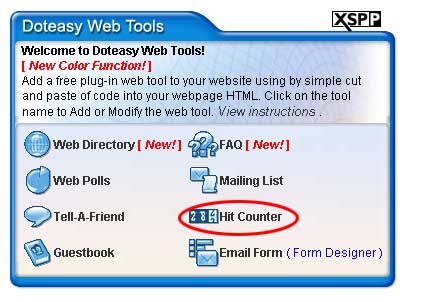
    1. Click on the Hit Counter link to proceed.

    1. Click on the “Create New Counter” link.

      Click Image To Enlarge
      Click Image To Enlarge

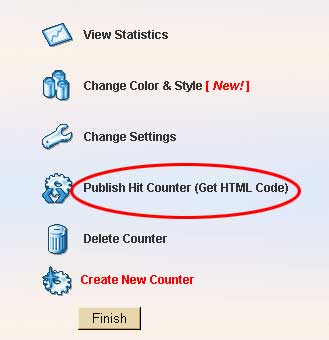
    1. Follow all of the on-screen instructions and enter required information. Once you have configured your Web Tool, you will need to publish it by inserting the Web Tool HTML code into your web page HTML. To do this, first click on the “Publish Hit Counter (Get HTML Code)” link. This will link to the Plug-in Code Window.

    1. Then you need to copy the entire lines of HTML code for pasting into you HTML page. Select the entire block of code and press CTRL-C to copy. The Web Tool can only be installed at the URL listed on the page. Click “Finish” to close the dialog box.

      Click Image To Enlarge
      Click Image To Enlarge

      Tip: You can insert your mouse cursor in the text box and press CTRL-A to select all, and CTRL-C to copy.

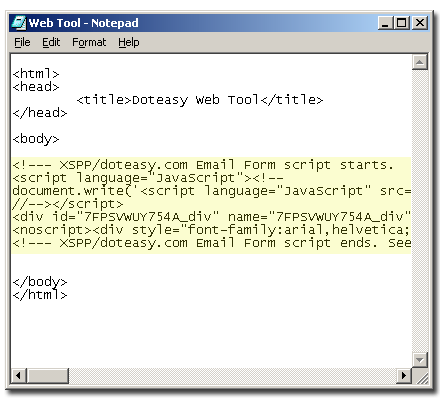
    1. Open the HTML page to which you would like to add the Web Tool in a text editor such as Notepad or Macpad. Please the cursor in between the and tags of the HTML code.

      Line breaks or word-wrapping cannot be introduced into the Web Tools plug-in code which is why it’s important to use a text editor to paste the plug-in code and not a word processor.

      Tip: The position within the and tags of the HTML code that you paste the Web Tools HTML code to, determines where it will appear on the page. If you want the Web Tool to appear at a lower position on the page, paste it closer to the tag.

  1. After you have successfully pasted the HTML code into your web page, save the changes and close your text editor software.

    Start your FTP software to upload your updated page to your server. If your FTP software asks you if you would like to overwrite the existing version of the page, you may reply us. Remember to refresh your web browser to properly display the changes.

    Please be advised that Web Tools will not display until they are PUBLISHED to your server. Therefore it is impossible to preview how the Web Tool will look on your.